
Label the skeleton worksheet answers – Embark on an enlightening journey into the intricate world of human anatomy as we delve into the fascinating realm of labeling the skeleton. This comprehensive guide will empower you with a deep understanding of the human skeletal system, providing you with the tools to effectively label and identify its various components.
Whether you’re a student seeking to excel in your studies or an educator aiming to enhance your teaching methods, this resource will prove invaluable.
Our exploration begins with a thorough examination of the human skeleton, uncovering the functions and locations of its major bones. We will then guide you through the purpose and benefits of using labeling worksheets, equipping you with the knowledge to maximize their effectiveness.
Delving deeper, we will showcase a diverse range of labeling worksheets, catering to different levels of expertise and target audiences.
Anatomy of a Human Skeleton
The human skeleton is a complex and dynamic structure that provides support, protection, and movement for the body. It consists of 206 bones, which are connected by joints and ligaments to form a rigid framework.
Major Bones and Their Locations
The major bones of the human skeleton can be divided into two main categories: axial and appendicular. The axial skeleton includes the bones of the head, neck, and trunk, while the appendicular skeleton includes the bones of the limbs.
- Axial Skeleton:
- Skull: Protects the brain and houses the sensory organs.
- Vertebral Column: Supports the body and protects the spinal cord.
- Rib Cage: Protects the heart and lungs.
- Appendicular Skeleton:
- Upper Limbs:
- Clavicle: Connects the shoulder to the sternum.
- Scapula: Forms the shoulder blade.
- Humerus: Upper arm bone.
- Radiusand Ulna: Forearm bones.
- Carpals, Metacarpals, and Phalanges: Bones of the wrist, hand, and fingers.
- Lower Limbs:
- Pelvic Girdle: Connects the legs to the trunk.
- Femur: Thigh bone.
- Tibiaand Fibula: Leg bones.
- Tarsals, Metatarsals, and Phalanges: Bones of the ankle, foot, and toes.
- Upper Limbs:
Labeling the Skeleton Worksheet
A labeling the skeleton worksheet is a valuable tool for learning and reinforcing the anatomy of the human skeleton. It helps students identify and locate the different bones of the skeleton, understand their relationships to each other, and appreciate the complexity of the human skeletal system.
To use a labeling the skeleton worksheet effectively, follow these steps:
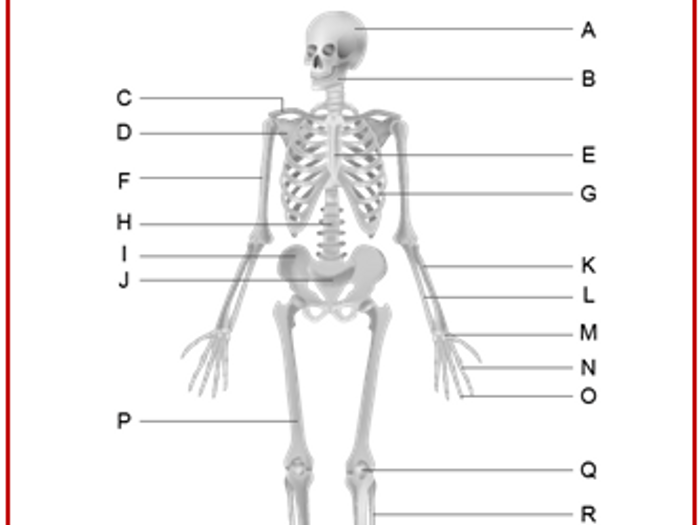
- Familiarize yourself with the different bones of the skeleton by studying a diagram or model.
- Identify the bones on the worksheet and write their names in the corresponding spaces.
- Use a variety of resources, such as textbooks, online databases, and anatomical atlases, to verify your answers and learn more about the bones.
- Review the labeled worksheet regularly to reinforce your knowledge and improve your understanding of the skeleton.
Benefits of Using a Labeling the Skeleton Worksheet
- Improves knowledge of the different bones of the skeleton.
- Enhances understanding of the relationships between bones.
- Reinforces anatomical terminology.
- Develops visual-spatial reasoning skills.
- Provides a foundation for further study of the human skeletal system.
Examples of Labeling the Skeleton Worksheets
Labeling the skeleton worksheets provide an interactive and engaging way to learn the different bones of the human skeleton. These worksheets can vary in difficulty, catering to students of different levels and ages.
Here are a few examples of labeling the skeleton worksheets:
Beginner Level Worksheets
Beginner level worksheets typically focus on the major bones of the skeleton, such as the skull, spine, ribs, and long bones of the arms and legs. These worksheets may provide a simplified diagram of the skeleton with blank spaces for students to fill in the names of the bones.
Intermediate Level Worksheets
Intermediate level worksheets include more detailed diagrams of the skeleton, showing the smaller bones and their relationships to each other. These worksheets may also require students to identify specific anatomical landmarks, such as joints, muscles, and ligaments.
Advanced Level Worksheets
Advanced level worksheets present a comprehensive view of the human skeleton, including all of the bones, joints, and other anatomical structures. These worksheets may also include questions about the functions of different bones and their role in movement and support.
| Worksheet Level | Key Features | Target Audience |
|---|---|---|
| Beginner | Simplified diagrams, major bones | Elementary school students |
| Intermediate | Detailed diagrams, smaller bones, anatomical landmarks | Middle school and high school students |
| Advanced | Comprehensive diagrams, all bones and structures, functional questions | College students, medical professionals |
Methods for Labeling the Skeleton
Labeling the skeleton is a crucial step in the study of human anatomy. It helps students and medical professionals identify and understand the different bones and their respective positions within the skeletal system. Several methods can be employed for labeling the skeleton, each with its own advantages and drawbacks.
Using Anatomical Terms
This method involves using specific anatomical terms to identify and label the bones. These terms are standardized and widely recognized within the medical community. To use this method, students need to familiarize themselves with the anatomical terminology and the corresponding bone names.
Step 1:Study the anatomical terms for the different bones.
Step 2:Identify the bones on the skeleton using the anatomical terms.
Step 3:Label the bones with the correct anatomical terms.
Color-Coding, Label the skeleton worksheet answers
Color-coding is a visual method that involves assigning different colors to different bones or groups of bones. This method can be helpful for students who find it difficult to remember the anatomical terms or for highlighting specific bones for educational purposes.
Step 1:Choose a color scheme for the different bones or groups of bones.
Step 2:Paint or mark the bones with the assigned colors.
Step 3:Create a legend that explains the color scheme.
Matching Bones to Descriptions
This method involves matching bones to their descriptions. It can be a more interactive and engaging approach for students who prefer a hands-on learning experience. To use this method, students need to have a set of bones and a list of descriptions for each bone.
Step 1:Read the descriptions for each bone.
Step 2:Examine the bones and try to match them to the descriptions.
Step 3:Label the bones with the correct descriptions.
Activities and Games for Learning Skeleton Anatomy
To enhance the learning experience and reinforce understanding of skeleton anatomy, engaging activities and games can be incorporated into the classroom or homeschool setting. These activities provide hands-on and interactive ways for students to explore the different bones and their functions.
Incorporating these activities into the curriculum allows students to actively participate in their learning, fostering a deeper understanding and retention of the subject matter.
Interactive Skeleton Model
Interactive skeleton models are invaluable tools for students to visualize and explore the skeletal system. These models often allow for the manipulation of individual bones, enabling students to observe their range of motion and articulation with other bones.
By physically handling and assembling the skeleton model, students gain a tangible understanding of the interconnections between different bones and their roles in movement and support.
Skeleton Scavenger Hunt
A skeleton scavenger hunt is an engaging activity that encourages students to identify and locate specific bones within a larger image or model of the skeleton.
This activity can be tailored to different skill levels by varying the difficulty of the clues and the number of bones to be found. It fosters visual recognition and spatial reasoning as students search for and identify the target bones.
Bone Bingo
Bone bingo is a fun and interactive game that tests students’ knowledge of different bones and their locations. Similar to traditional bingo, students receive cards with a grid of bone names.
As the teacher calls out the names of bones, students mark off the corresponding squares on their cards. The first student to mark off a complete row or column wins.
Skeleton Charades
Skeleton charades is a lively game that combines physical activity with learning. Students take turns acting out the movement or function of a specific bone, while their classmates guess the correct bone.
This activity encourages students to think creatively and express their understanding of the skeleton’s functions through movement.
Online Skeleton Games and Simulations
Numerous online skeleton games and simulations are available to supplement classroom activities. These interactive resources provide students with engaging and immersive experiences that reinforce their understanding of skeleton anatomy.
From virtual bone puzzles to interactive quizzes, online games offer a diverse range of learning opportunities that cater to different learning styles and preferences.
Assessment and Evaluation: Label The Skeleton Worksheet Answers
Assessing students’ understanding of skeleton anatomy is crucial to evaluate their learning and identify areas that require further support. Various methods can be employed to assess student comprehension, including:
Quizzes
- Short, timed assessments that cover specific aspects of skeleton anatomy.
- Multiple-choice, true/false, or short-answer questions.
- Can be administered regularly to monitor student progress and provide feedback.
Tests
- Comprehensive assessments that cover a broader range of skeleton anatomy topics.
- May include multiple-choice, short-answer, essay, or labeling questions.
- Typically administered at the end of a unit or course to evaluate overall understanding.
Projects
- Hands-on activities that allow students to demonstrate their understanding of skeleton anatomy in a creative and engaging way.
- Examples include building a model skeleton, creating a poster or presentation, or designing a game that teaches about the skeleton.
- Provide opportunities for students to apply their knowledge and develop critical thinking skills.
Advanced Labeling Techniques
3D Models and Virtual Reality Simulations
In recent years, advanced labeling techniques have emerged, such as utilizing 3D models and virtual reality (VR) simulations. These technologies provide interactive and immersive experiences that enhance the learning process of skeletal anatomy. Advantages:
- 3D models and VR simulations allow students to explore skeletal structures from multiple angles, providing a comprehensive understanding of their spatial relationships.
- These technologies enable students to manipulate and interact with virtual skeletons, enhancing their understanding of bone articulations and muscle attachments.
- VR simulations immerse students in realistic anatomical environments, promoting a more engaging and memorable learning experience.
Disadvantages:
- Advanced labeling techniques can be more expensive and time-consuming to implement compared to traditional labeling methods.
- These technologies require specialized equipment and software, which may not be readily available in all educational settings.
- Some students may experience discomfort or motion sickness when using VR simulations.
Overall, advanced labeling techniques using 3D models and VR simulations offer significant benefits in teaching skeletal anatomy, providing interactive and immersive learning experiences that enhance student understanding. However, it is important to consider the practical limitations and ensure these technologies are implemented effectively to maximize their educational value.
Applications of Skeleton Labeling
Skeleton labeling plays a vital role in various fields, enabling researchers and professionals to gain insights into the structure, function, and evolution of the human body.
In medicine, skeleton labeling is used to:
- Diagnose bone fractures, tumors, and other abnormalities.
- Plan surgical procedures involving bones.
- Study the effects of diseases on the skeleton.
In forensic science, skeleton labeling is used to:
- Identify human remains.
- Estimate the age, sex, and stature of an individual.
- Reconstruct the circumstances of a death.
In anthropology, skeleton labeling is used to:
- Study the evolution of the human skeleton.
- Compare the skeletons of different populations.
- Reconstruct the lifestyles and behaviors of ancient humans.
Real-World Examples
One notable example of the application of skeleton labeling is the identification of the remains of King Richard III of England. In 2012, archaeologists discovered a skeleton in a Leicester car park that was later identified as belonging to the king through a combination of DNA analysis and skeleton labeling.
Another example is the use of skeleton labeling to study the effects of osteoporosis on the human body. Researchers have used labeled skeletons to measure the density and thickness of bones, providing insights into the mechanisms of bone loss and fracture risk.
FAQ Corner
What is the purpose of labeling the skeleton worksheet?
Labeling the skeleton worksheet is a valuable tool that helps students identify and memorize the different bones and structures of the human skeleton. It enhances their understanding of human anatomy and provides a foundation for further studies in biology and medicine.
How do I use a labeling the skeleton worksheet effectively?
To effectively use a labeling the skeleton worksheet, follow these steps: 1) Familiarize yourself with the different bones and their locations. 2) Study the diagram provided and identify the bones that need to be labeled. 3) Use anatomical terms to accurately label each bone.
4) Check your answers against the answer key to ensure accuracy.
What are some tips for labeling the skeleton?
When labeling the skeleton, consider using different colors to differentiate between different types of bones. You can also use anatomical terms to describe the location and orientation of the bones. Additionally, matching bones to their descriptions can help reinforce your understanding.
